What is an E-Clip?
An E-clip, also known as a circlip or E-ring, is a retained ring with openings on each end that snaps in place. Circlips are fasteners that fits into a radial groove of either shafts or hole locations and are also spring loaded to provide a secure d fitment. Retaining rings such as the snap ring are typically removed using circlip or C-clip pliers made specifically for them.
E-clips are a tool primarily used for project related to car engines or locking mechanisms. They have a “E” shape with one side having an opening. Another name for E-clips, are large retaining rings, retaining rings are used to hold parts on a spinning shaft when installed in a groove.
All retaining rings have a “C” shape and are able to expand when fitting around a shaft or contracting when fitted into a hole. The ring clip or E-ring or E-clips have relatively the same shape as the letter “E”. They are typically one of the most common external locking rings.

Standard retaining rings come in internal and external designs. Internal retaining rings are fitted into the groove of a hole while external retaining items fit into a groove around the outside of the shaft or rod.
Retaining rings are used as a substitute for mechanical fasteners, such as nuts, split pins, rivets etc, and usually present a lower weight solution to an assembly, usually also offering a longer lifespan.
The three prongs of an E-ring engage with the bottom of the groove to form a shoulder, which effectively holds the assemblies. Whereas for a snap ring there is the need to move the snap ring along the axis of a shaft or rod for removal down the line, the E-ring can simply be removed from the side, without wishing to move the axis.
How to Remove E Clips?
To remove an e-clip, use a removal tool, needle nose pliers or a small flat bladed screwdriver. Grab the E-clip with the appropriate tool and push up with moderate pressure. An e-clip can be removed with another household tool quite easily.
3 Ways to Remove E Clip:
1. Using an E-Clip Remover
- Alignment of your removal tool with the edge of the E-clip is needed. Most e-clip removers are smooth and often have a curved edge. Align the curved edge of your tool with the curve of the E-clip, and push your tool directly underneath the E-clip. There are various types of e-clip removers, but you are able to use all of them in a similar fashion.
- Push up and maintain steady, moderate pressure, and simply push your tool once you have it aligned with the E-clip, and it will pop free from its position. Don’t push too hard or the E-clip can fly away!
- Store your E-clip in a dry location until you need to re-use it. You could place your E-clip into a storage jar, container, or even directly into the container. You will be able to easily re-use them many times for each of your multi-tools and projects!
2. Removing an E-Clip with Pliers
- Move the center of the E-clip aside so that you can grab it. For ease of removal consider that the curved side of the E-clip is facing you. You can simply use your fingers or needle-nose pliers to twist it, if necessary. The E-clip will slide with moderate pressure.
- Grasp the center of the E-clip to ease its removal with needle-nose pliers. Squeeze the center of your E-clip close with the tip of your needle-nose pliers. With a firm hold on the pliers you can remove the clip. Needle-nose pliers work best to easily remove the E-clips. However, you can use other types of pliers, for example, slip joint pliers or locking pliers.
- Once you have a hold of the E-clip pull it toward you with moderate pressure. While holding the E-clip, pull on the pliers to release the clip from its position. If you having any difficulty holding the E-clip, adjust your pliers so that the tips are closer to the center.
3. Using a Flathead Screwdriver
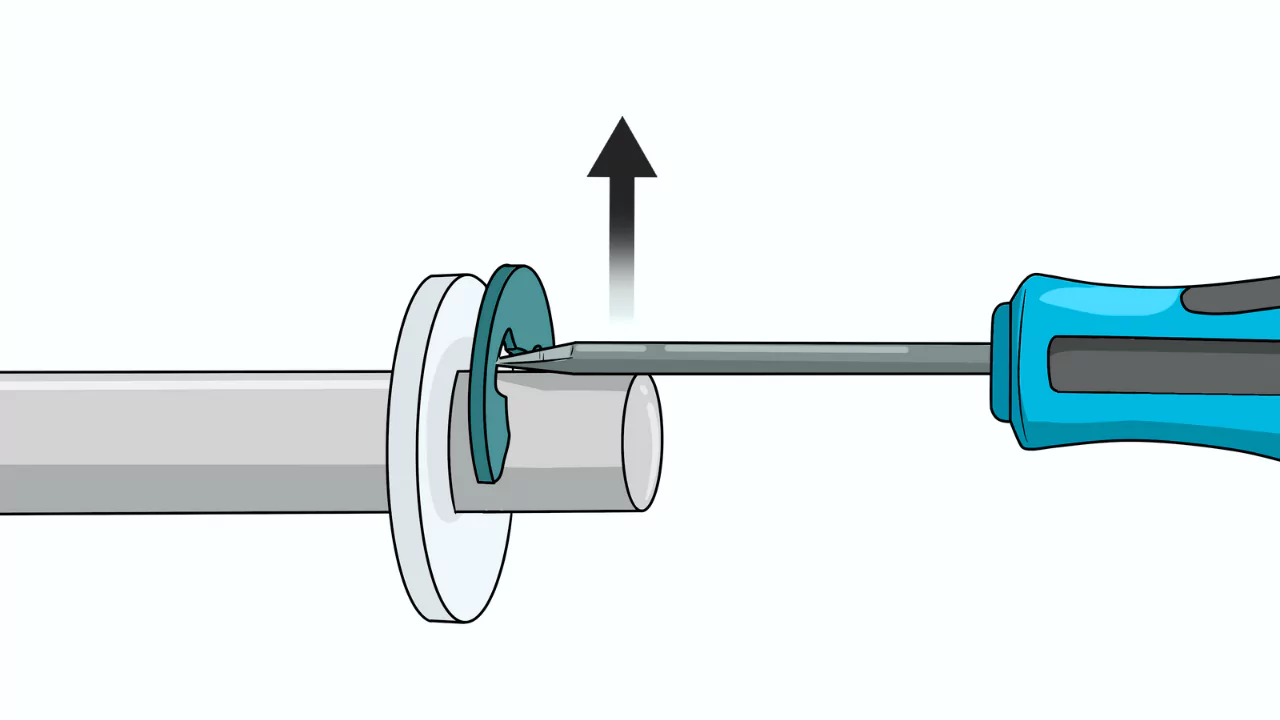
- Align the screwdriver with one of the two small grooves in the middle, and insert the tip of your screwdriver into the groove on the clip. Each E-clip has two small grooves in the middle, one for the left side and one for the right side. You can use either of the two grooves to remove the E-clip, but for optimal conditions, use a size of screwdriver similar to that of the E-clip.
- Put your finger right next to the E-clip to catch it when you move. Hold your index finger of your non-dominant hand up to the E-clip at the top; this may prevent the E-clip from flying far away when it is released.
- Push up on the screwdriver with moderate pressure, but consistently push the downward pressure in an upward direction. Use your dominant hand to hold the screwdriver so that you are consistently taking a downward movement upwards. The E-clip should come out easily, but if it doesn’t easily come out, then provide a little bit more pressure.
Size of E clip
The nominal size of an E-clip is the maximum groove diameter that the clip was engineered for. Other vital components of an E-clip are the neck width and the free diameter.
The neck width is the size of the opening, to get this and the free diameter, which is , the outermost diameter, are taken from the E-clip, while the ring clip is in its relaxed state.
Materials
E-Clips are manufactured from several different materials: copper, stainless steel, carbon steel and alloy steel; depending on if the application requires corrosion resistance.
Uses
The use of E-Clips is extensive in machines and equipment from simple hand tools to complex pieces of air craft. E-Clips are also used in transportation and railway systems because of the ease of installation and ease of removal.
Pros and Cons
Other advantages of an E-clip it: the ability to easily push it into a machined groove without any special tooling. However, at a minimum just basic pliers or a screwdriver can give assistance pushing it onto or off of a shaft.
It does not require a circular shaft. Overall, generally it makes a unique attribute compared to other fasteners such as eliminating any tapping, tapping, or machining operations.
In general, E-Clip comes in a variety of sizes and types based on the application. For retaining rings, it is important that the component dimension as it is best to provide a tighter fit to minimize loosening.
One possible disadvantage of e-clips is that they can have the specifications limited load bearing capacity depending on the specific requirement. Regardless, it is also important to mention that if it tightly overtightens it can damage the shaft or the produced assembly.
FAQs
What is the function of E-clip?
A E-clip is a fastener that holds components or assemblies onto a shaft or in a housing, bore when installed in a groove. Once installed, the exposed portion acts as a shoulder which retains the specific component or assembly.
What is the difference between C and E-clip?
E‑clips are installed radially and have a wider shoulder than their C‑clip counterparts. This wider shoulder provides a larger retaining area, yielding higher thrust load capacities.
What is the difference between E-clip and snap ring?
Unlike a snap ring, which must be slid along the axis of a shaft or rod for removal, an E-ring is easily removed from the side without any axis movement. The typical size of an E-clip is the maximum diameter of grooves for which the clip is designed.
What can I use instead of an E-clip?
Snap rings are often easier (with snap ring pliers) to remove and reinsert than the e-clips used on some tools. Because of that, have replaced the e-clips on several tools with snap rings instead to make future maintenance quicker and easier.
Can you reuse e-clips?
If possible try to save the old E-Clips as they can be reused. This is accomplished by relaxing the jaws holding the end of the strap onto the clip. An easy way to do this is to slide the E-Clip onto the frame, then slowly lift up on the exposed clip while clip is still attached to the frame.