What is Hammer?
A hammer is a fundamental tool usually operated by hand composed of a solid, weighted head attached to a handle. The design allows the user to swing the tool, concentrating force on a specific, usually small, area of an object. People commonly use hammers to drive nails into wood, shape pieces of metal, or even break apart rocks.
The versatility of hammers is impressive; they find applications in everything from driving and shaping materials to breaking objects or striking without causing damage.
Some of the most traditional areas where hammers play a vital role include carpentry, blacksmithing, certain forms of combat, and even in musical performances that require percussive techniques.
When people talk about “hammering,” they’re typically referring to the straightforward use of a hammer to strike, rather than using any secondary features the tool might have like a claw for pulling nails or a hook for grabbing.
In fields such as carpentry or blacksmithing, the hammer is generally used from a stationary position, with both the tool and the target object held steady. The user grips the handle with one hand, swinging in a downward arc that adds significant kinetic energy to the blow.
Most of the motion comes from the shoulder and elbow, with the wrist snapping just before impact to maximize force.
If someone needs to deliver an exceptionally powerful hit, they might bring their torso and knees into the motion, effectively lowering the shoulder to lengthen the swing. While this does increase impact, it can also be quite exhausting if repeated frequently.
When it comes to war hammers tools designed for combat the technique changes. These are often swung in horizontal or diagonal arcs, rather than just up and down.
Much more of the energy comes from the legs and hips, sometimes with a lunge, especially when the target is moving. This dynamic approach harnesses the body’s full momentum to maximize the hammer’s effect.
How To Use A Hammer?
A surprising number of injuries stem from something as basic as incorrect hammer use. In fact, statistics show that in the United States alone, improper use of workshop tools leads to nearly 120,000 injuries every year. Of these, approximately 30,000 incidents are specifically linked to hammers.
With that in mind, there are a few key practices everyone should follow to ensure safety when handling a hammer:
- First things first: check your tool. It might sound obvious, but a quick inspection can make all the difference. If a hammer shows visible wear like a wobbly head, rusty patches, or splintering along the handle it’s best not to risk it. Using a damaged hammer can easily lead to breakage and potentially serious injuries.
- Don’t underestimate eye protection. Even though it might seem unnecessary, wearing safety glasses is essential. All it takes is one stray nail or a small piece of debris, and you could be dealing with a preventable injury.
- Stay present. This isn’t the time to multitask or let your mind wander. Distraction, even for a moment, can mean a missed swing or worse.
- Proper technique matters. Before you begin, take a quick look behind you and around your workspace. You want to be certain there’s nothing or no one in your swing zone.
As for your grip, hold the hammer with your thumb wrapped over the top of the handle. This hand placement offers better control and stability. Keep your grip secure so the hammer doesn’t slip, and align it with your target.
When it comes to actually driving a nail (or whatever you’re working with), start softly. A light tap gets things started and helps you line everything up before you put your weight behind the next few swings. Most jobs don’t require brute force—steady, moderate pressure usually does the trick.
On a related note, modern hammers like those in our collection are engineered with features such as ballistic balance for optimal striking and grips designed to absorb shock, which not only improves control but also helps reduce joint fatigue over time.
It’s worth noting that technique can vary a bit depending on the specific hammer you’re using, but the fundamentals outlined here apply broadly across the board.
Types of Hammers

There’s actually quite a variety of hammers out there they come in different shapes, sizes, and weights, each design serving a specific purpose. But honestly, if you’re just doing odd jobs around the house, you’ll probably find that one or two types are all you really need.
Interestingly, the basic shape of a hammerhead hasn’t changed much over time. Sure, you’ll see some newer materials these days in both the head and the handle, but the overall design has stayed pretty consistent.
Traditionally, hammer handles were made from wood and fitted through a hole in the head. This setup made it pretty straightforward to swap out the handle if it ever broke.
These days, though, hammers are made with all sorts of modern materials, and it’s common for the handle to be integrated right into the head. Many of these newer models even include a built-in shock absorber, which definitely makes them more comfortable to use.
List of The Most Common Types of Hammers and Their Purpose:
- Ball Peen Hammer
- Brick Hammer
- Claw Hammer
- Drywall Hammer
- Electrician Hammer
- Framing Hammer
- Sledgehammer
- Tack Hammer
- Trim Hammer
- Cross and Straight Pein
- Cross Pein Pin Hammer
- Club Hammer
- Joiner’s Mallet
- Soft-faced Hammers
- Scaling Hammer
- Powered Nailers Hammer
- Dead Blow Hammer
- Blacksmith Hammer
- Blocking Hammer
- Brass Hammer
- Bushing Hammer
- Chasing Hammer
- Hatchet Hammer
- Rock Hammer
- Scutch Hammer
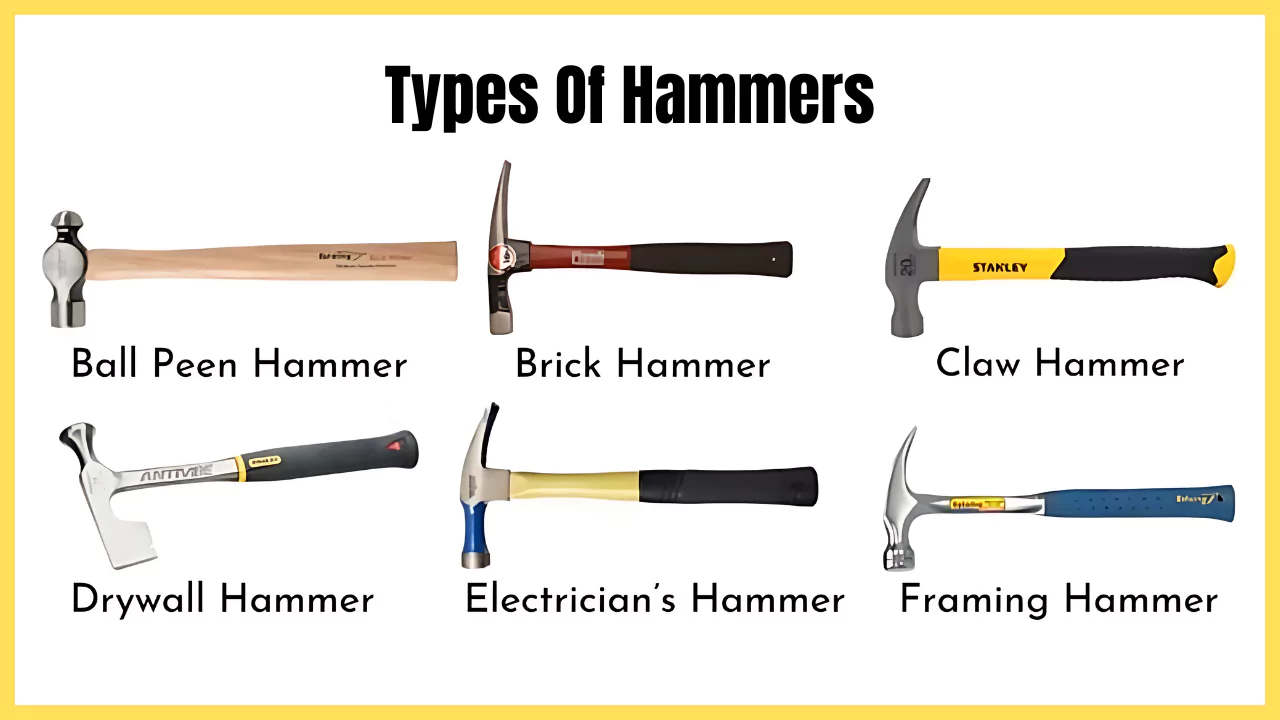
#1. Ball Peen Hammer.
The ball-peen hammer, sometimes referred to as a machinist’s hammer, stands out due to its two distinct ends—one rounded (the “peen”) and one flat.
While its primary association is with metalworking, this hammer is actually quite versatile. It’s commonly employed for striking punches and chisels, as well as for rounding off the edges of rivets.
Engineers tend to favor the ball-peen hammer, particularly because the rounded peen is ideal for shaping metal and closing rivets.
When it comes to sizing, ball-peen hammers are available in a range that spans from 55 grams (about 4 ounces) up to 1100 grams (or 2 pounds). For everyday use, weights between 110 and 165 grams (roughly 8 to 12 ounces) tend to be the most practical.
As for the handle, manufacturers typically use hardwoods like ash or hickory, both valued for their durability and comfortable grip.
#2. Brick Hammer.
A brick hammer, commonly known as a stonemason’s hammer, is characterized by its flat striking face on one side and a chisel-shaped blade on the other.
This specialized design allows users to break or chip away pieces from materials such as brick, stone, or concrete with precision and control.
Typically, brick hammers are constructed with durable, high-quality steel heads to withstand repeated impact. The handles are usually crafted from either fiberglass or hardwood, offering both strength and comfort during use.
#3. Claw Hammer.
The claw hammer is arguably the most commonly used type for general tasks, and it typically comes with a handle made from wood hickory being a popular choice as well as options in glass-fiber or steel. Some versions feature a rubber grip for added comfort, while others do not.
When it comes to weight, most people tend to prefer hammers in the range of 455 to 680 grams (or 16 to 24 ounces). The design usually includes a curved claw with a ‘V’-shaped notch, which is intended for pulling nails out of wood.
Besides its primary purpose, the claw can also be handy for lifting floorboards or in any situation where a bit of leverage is needed. However, it’s important to be careful especially if you’re using a budget-friendly hammer since putting too much force on the claw could compromise the connection between the head and the handle.
Some claw hammers feature a “waffle” or textured face on the striking surface, while others, like our 20-ounce smooth-face nailing hammer, have a plain surface.
The textured face is great for preventing slips and improving accuracy, but it does have a downside: it can leave patterned marks on whatever you’re working with. In contrast, a smooth-faced hammer usually avoids leaving any imprint on the surface.
#4. Drywall Hammer.
The straight peen hammer is equipped with a uniquely designed end, which is somewhat reminiscent of a hatchet, distinguished by a notch at its base.
This specific feature the notch serves a practical purpose: it allows users to hold nails securely in position without causing any harm to the drywall paper. Additionally, the blade-like section of the peen proves useful for safely trimming away excess pieces of drywall when necessary.
#5. Electrician Hammer.
An electrician’s hammer closely resembles a standard claw hammer in both appearance and function. The main distinction lies in its design: it features an insulated fiberglass handle and a rubber-coated grip.
These elements make it suitable for electrical work by offering protection against electric shock. Additionally, the striking face is somewhat longer than that of a typical claw hammer, which proves especially useful when working in confined or awkward spaces.
What further sets this tool apart is the extended neck on the hammerhead. This modification enables electricians to reach and drive nails that would otherwise be difficult to access, particularly those located in tight or obstructed areas.
In essence, the electrician’s hammer is a thoughtful adaptation of the traditional claw hammer, fine-tuned for the specific challenges electricians often face on the job.
#6. Framing Hammer.
A framing hammer stands out from the typical claw hammer mainly due to its weight. Where most standard claw hammers top out at about 16 ounces, a framing hammer can be twice as heavy—sometimes reaching up to 32 ounces.
The one we use, which features a milled face, sits right in the middle at 22 ounces. This extra heft, combined with the waffled texture on the striking surface, makes it much easier for contractors to drive nails efficiently.
The added weight and grip help prevent nails from slipping, letting users work both faster and with more confidence.
#7. Sledgehammer.
This tool is typically reserved for demanding tasks, like driving stakes into the ground or breaking up tough materials such as concrete, stone, or masonry. When it comes to lighter work, you can often rely on just the weight of the hammer’s head to deliver the necessary force.
However, for those bigger, tougher jobs, you’ll need to swing the hammer much like you would an ax to get the job done. It’s also important to prioritize safety make sure to wear the right protective gear, especially safety glasses. These hammers commonly come in weights of 7, 10, or 14 pounds.
#8. Tack Hammer.
A tack hammer, sometimes referred to as an upholstery hammer, is a light, specialized tool primarily used for securing upholstery to furniture or other surfaces.
What sets most tack hammers apart is their dual-faced design; notably, one of the faces is split and magnetized, making it easier to hold and position tacks precisely where you want them before driving them in.
#9. Trim Hammer.
A trim hammer, which closely resembles a tack hammer in both size and weight, is essentially a compact hammer equipped with a straight claw. It’s particularly useful for driving trim nails because its design helps ensure that the surrounding surfaces remain undamaged during the process.
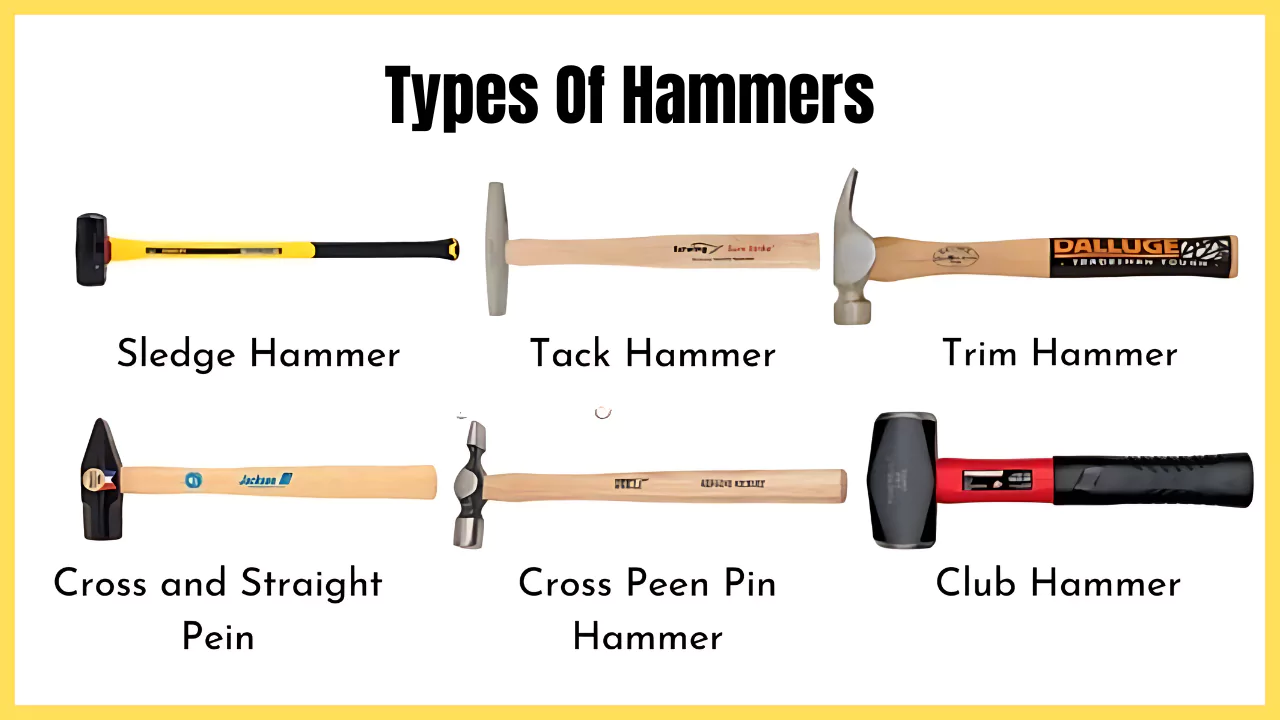
#10. Cross and Straight Pein.
When it comes to working with metal, the design of the hammer’s pein plays a significant role. You’ll often see the pein either positioned at a right angle to the handle or running parallel with it. For most household tasks, the cross pein hammer tends to be the go-to choice.
Its shape makes it much easier to start panel pins and tacks, especially when you want to avoid the classic mishap of striking your own fingers. Traditionally, these hammers are fitted with wooden handles, and ash is the wood of choice thanks to its durability and comfortable grip.
Focusing on the cross pein itself, its wedge-like edge sits horizontally. This feature isn’t just about looks it’s genuinely helpful when you’re dealing with small fasteners like panel pins or tacks.
The pein allows you to get them started securely and safely, all without risking your fingers. And of course, beyond these domestic uses, the same tool comes in handy for shaping metal, making it a versatile addition to any toolkit.
#11. Cross Pein Pin Hammer.
This lightweight version of the cross and straight pein hammer, weighing just 55 grams (4 ounces), is a go-to choice for anyone working on precise joinery or detailed cabinet projects. Unlike its heavier counterparts, this hammer isn’t really made for metalworking.
Instead, it finds its strength in woodworking tasks where a gentle touch and accuracy are essential, making it particularly handy for tasks like assembling cabinets or handling fine joinery work.
#12. Club Hammer.
Commonly referred to as a lump hammer, this tool features a head with two striking faces. It’s particularly handy for tasks such as light demolition, as well as for driving steel chisels and masonry nails.
Given that bits of debris can easily become airborne during use, it’s wise to wear safety glasses and sturdy work gloves for protection.
For most household jobs, a hammer weighing around 1135 grams (or 2½ pounds) tends to be the most practical choice. You’ll typically find handles made from wood hickory being a popular option or from various synthetic resins.
#13. Joiner’s Mallet.
This tool is designed specifically for tasks where you need a gentle touch like driving chisels or fitting wood joints together because using a metal-faced hammer could leave dents or marks you don’t want. If you take a close look, you’ll notice the head is slightly tapered.
That’s intentional, as it helps make sure the tool strikes the wood just right, without slipping off or damaging the surface. Traditionally, both the head and the handle are made from wood Beech and Lignum Vitae are common choices, thanks to their durability and the way they handle repeated use.
#14. Soft-faced Hammers.
There are several types available, featuring faces made from hard or soft rubber, plastic, or even copper. Some models are designed with interchangeable faces, offering flexibility depending on the task at hand.
These tools are particularly useful when working with materials like chrome wing outs, since using a steel face could easily cause damage. In fact, in certain woodworking applications such as cabinetmaking they can sometimes serve as a substitute for a traditional mallet.
#15. Scaling Hammer.
Unlike standard hammers, these tools come with a vertical chisel on one side and a pick on the other. This design makes them especially useful for tackling stubborn layers think scale, rust, or those tough coatings that build up on boilers and similar surfaces.
You’ll often find pneumatic versions, too. Depending on the job, you can pick from models with one, two, or even three heads, and they work a bit like a jackhammer delivering rapid, powerful blows that make the removal process much easier.
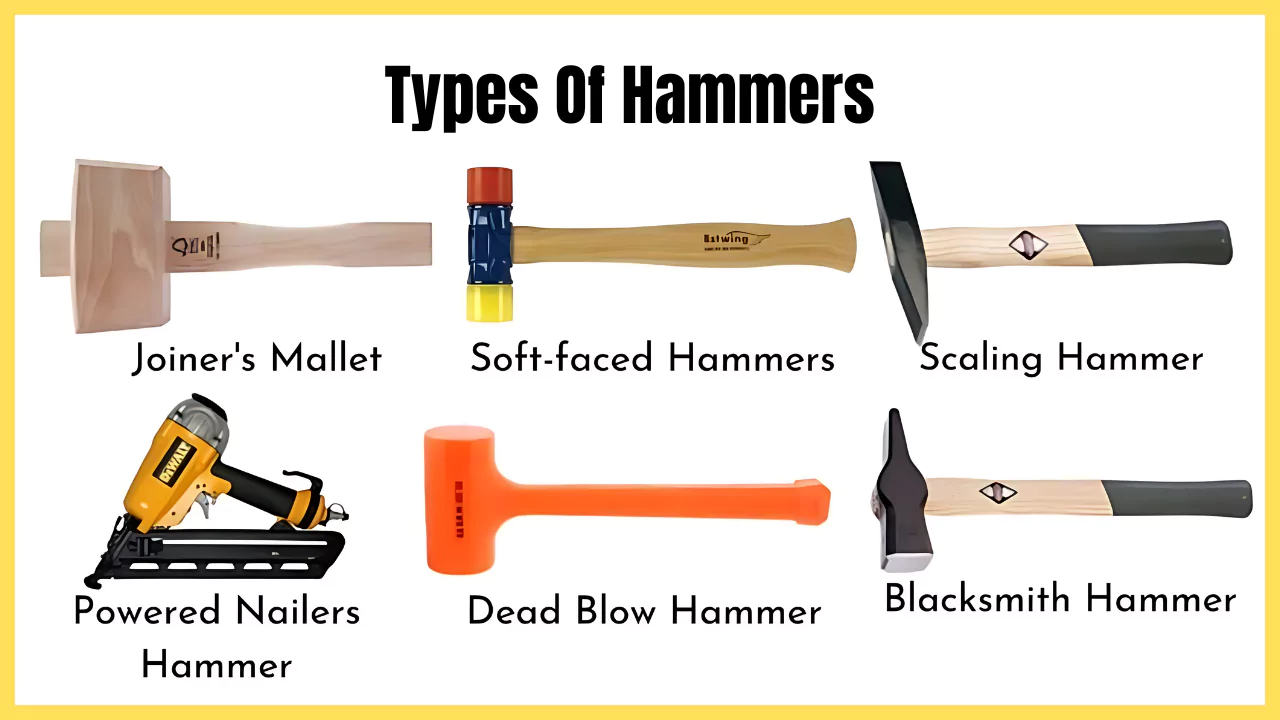
#16. Powered Nailers Hammer.
Nailers and staplers significantly reduce the manual effort involved in installing nails, staples, and similar fasteners. They are particularly advantageous in situations that require a high volume of fixings, for instance, when securing floorboards.
These tools are available in various types, ranging from light-duty models well-suited for tasks such as attaching edge moldings or assembling picture frames to heavy-duty versions, which are designed for more demanding applications like installing floorboards or garden decking.
Power for these devices typically comes either from compressed air canisters or from electrical sources, depending on the specific model.
#17. Dead Blow Hammer.
This type of hammer features a head specifically crafted to minimize rebound and deliver gentle, controlled strikes. The head itself is often made from solid rubber or plastic, though you’ll also find some with a semi-hollow design that’s filled with sand or lead shot to absorb shock.
You’ll see these hammers used in a wide range of settings everything from woodworking shops to automotive garages.
They’re especially handy when you need to loosen parts, tap out small dents, or fit pieces of wood together (or take them apart), all without leaving marks or damaging the surfaces you’re working on.
#18. Blacksmith Hammer.
Contrary to how blacksmithing tools are often portrayed in fantasy games, the traditional blacksmith’s hammer is actually a form of sledgehammer.
What sets it apart is that one of its heads is subtly tapered and rounded, a feature intended to aid in shaping red-hot steel when working against an anvil.
#19. Blocking Hammer.
This particular hammer is easily recognized by its unique design: one side has a flat, square head, while the opposite end features a cylindrical shape. It’s a staple tool for blacksmiths, who rely on it for a range of metalworking tasks.
Whether shaping heated metal on an anvil or refining details on a block, this hammer provides the balance and versatility needed for precise work.
#20. Brass Hammer.
A brass hammer features a slim, cylindrical double-headed design, making it particularly useful for striking steel pins while minimizing the risk of damaging adjacent surfaces.
This type of hammer is a familiar sight in both automotive and woodworking environments, valued for its gentle yet effective impact.
#21. Bushing Hammer.
This distinctive hammer, which closely resembles a meat tenderizer but features a longer metal head, serves a specific purpose in stonework.
Craftspeople use it to create a roughened surface on stone, not only for decorative appeal but also to enhance safety by making stone walkways less prone to becoming slippery.

#22. Chasing Hammer.
The chasing hammer stands out among other hammers due to its unique design. It features a handle with a rounded, bulb-like end, a head that is also smoothly rounded, and a small, circular pein. Jewelers often reach for this particular hammer when they need to shape metal pieces for their work.
#23. Hatchet Hammer.
The hatchet hammer, sometimes called a half-hatchet, stands out as one of the more distinctive hammer types. Instead of the traditional peen, it features an axe blade on one side, which gives it a unique edge literally and figuratively.
Because of this design, it proves useful for a wide range of tasks, making it a smart addition to survival kits or emergency tool sets.
#24. Rock Hammer.
A tool often known as a pick hammer features a flat striking surface on one side, with either a chisel or a pick on the opposite end.
This instrument is commonly employed in fields such as geology and archaeology, where it is particularly useful for breaking apart small rocks during excavation or sampling.
The chisel end of the hammer is quite versatile. It can be used to split softer types of rock, clear away vegetation that may be covering a work area, or even to carve out small holes when needed. This adaptability makes it an essential tool for many field tasks.
Alternatively, when the hammer is equipped with a pick often referred to as a geologist’s pick it becomes suitable for splitting or prying apart harder stones.
Beyond geological or archaeological use, professionals like bricklayers sometimes rely on rock hammers to break down old mortar joints or to remove sections of brickwork efficiently.
#25. Scutch Hammer.
Scutching refers to the technique used to remove old mortar from bricks or paving stones. The specialized hammers designed for this task typically feature either a single head with a chisel shaped, slotted holder for a scutch comb, or two holders for comb attachments.
These holders are made to accommodate scutch combs, which work much like toothed chisels (sometimes called droves). The choice between using a single-headed hammer or one with multiple scutching attachments really comes down to the user’s personal preference and the specific requirements of the job at hand.
Tips for using hammers
- Select the Appropriate Hammer: It’s important to choose the correct hammer for each specific task. Doing so not only makes your work more efficient but also reduces the risk of damaging either the tool or the material you’re working on.
- Strike with the Proper Surface: Avoid using the side of the hammerhead or the cheek to drive nails. These areas aren’t as hardened as the striking face and may become damaged if used improperly.
- Protect Delicate Materials: When working with fragile or finished surfaces, try placing a scrap piece of wood between the hammer and your work. This simple step helps shield your project from unwanted dents or marks.
- Use a Nail Punch for a Clean Finish: To drive nails below the surface of timber without marring it, use a nail punch. Unlike other punches with pointed tips, a nail punch features a flat or slightly concave end that matches the head of the nail, resulting in a tidier finish.
- Check Hammer Handles Regularly: For hammers with wooden handles held in place by steel wedges, it’s good practice to inspect the tightness of these wedges periodically. Wood can shrink, especially in dry conditions, and a loose handle is both inefficient and unsafe.
- Tighten Loose Handles with Water: If you notice a wooden handle starting to loosen, you can soak the hammerhead in water overnight. The handle will swell, securing it more firmly inside the hammerhead.
- Increase Grip with Abrasive Paper: Should the hammer’s face start slipping off nails, lightly roughening the surface with medium-grade abrasive paper can help improve grip.
- Always Wear Eye Protection: Whether you’re driving masonry nails or breaking up concrete, safety glasses are essential. Even a single stray fragment can cause serious injury, so don’t skip this step.
FAQs
What are 5 different types of hammers?
1. Claw Hammer.
2. Ball Peen Hammer.
3. Sledgehammer.
4. Rubber Mallet.
5. Tack Hammer.
What is bigger than a hammer?
Sledge hammers are larger than most hammers and feature a metal, mallet-like head. Heavier sledge hammers with longer handles are intended to be swung with both hands.
What is a large mallet called?
Beetle mallets, also called a persuader or commander, are large mallets with a wood or plastic head, with rounded ends about 15 to 18 inches (380 to 460 mm) in diameter, and a handle about 3 feet (0.91 m) long.
What are small hammers called?
Tack hammers are for jobs that require delicacy and precision. Often called a Swiss style mini hammer, the tack hammer features a small, flat head and a narrow pointed end. These small tools are most often used in the fields of cabinetry and upholstery, which use small nails and tacks, and require much less force.
What are the 6 types of hammers?
Here are six of the most popular hammer choices:
1. Claw Hammer.
2. Warrington Hammer / Joiner’s Hammers / Cross Pein Hammer.
3. Ball Pein Hammer / Engineer’s Hammer / Mechanic’s Hammer.
4. Club Hammer or Lump Hammer.
5. Sledge Hammer.
6. Mallet.
What are 4 different specialty hammers and their uses?
These include a Brick Hammer for striking a bolster or splitting bricks; Woodcarving Mallet, with rounded body; Veneer Hammer, for pressing and tapping veneers into place; Upholsterer’s hammer for driving tacks and nails in confined spaces, and Sprig Hammer, used by picture frame makers.