People unfamiliar with welding whether they’ve never taken a class or worked in the field often imagine the process as straightforward: a welder seated comfortably at a table, easily manipulating metal pieces and adjusting them as needed. In reality, though, welding on the job is rarely that simple.
In actual work settings, metal components might be fixed in challenging positions—on the ceiling, near the floor, or in tight corners making the task far more complex than it may appear at first glance.
To address these challenges, welders rely on a set of techniques tailored to various physical orientations of the workpiece.
This led to the development of four standard welding positions, each designed to accommodate a different welding scenario. Understanding these positions is key to selecting the appropriate welding method, adjusting parameters effectively, and choosing the right filler metal.
Each position comes with its own set of technical considerations and best practices. Knowing how to approach them can make a significant difference in the quality and efficiency of the weld.
In the sections that follow, we’ll take a closer look at each of these four welding positions and offer some practical guidance for working with them.
What Is a Welding Position?
To assist welders in identifying both the type of weld joint whether fillet or groove and the required weld position, a system of letters and numbers is used. Designations like 1G, 2G, 3G, 4G or 1F, 2F, 3F, 4F indicate not only the position but also the nature of the weld.
In this system, the number refers to the welding position: “1” denotes flat, “2” horizontal, “3” vertical, and “4” overhead. The accompanying letter specifies the joint type, where “F” stands for fillet weld and “G” indicates a groove weld.
A fillet weld typically connects two metal pieces that intersect at a right angle or at a slight angle, forming a triangular cross-section.
On the other hand, a groove weld is created within a groove either between the edges of two workpieces or along a joint prepared with a specific geometry. So, for example, a 2G weld would refer to a groove weld performed in the horizontal position.
These classifications aren’t just theoretical they’re commonly found in Welding Procedure Specifications (WPS) and on filler metal data sheets. These documents highlight the capabilities of specific filler metals, including which positions they are suitable for.
In practice, the flat position is generally the most favorable for welding. It allows for easier control of larger molten weld pools, which in turn can make the welding process more efficient and help complete joints more quickly.
However, when welds must be made in positions other than flat, they’re considered “out-of-position” welds. Not all groove types perform equally well in these scenarios. For instance, bevel joints tend to be more effective for horizontal butt welding, offering better weld quality and control in that specific position.
MORE: What is Welding?
Different Welding Positions
The American Welding Society (AWS) categorizes plate welding into four primary positions, each applicable to both groove (G) and fillet (F) welds. These positions are essential for understanding how welds are performed relative to the joint’s orientation. Here’s a breakdown of each:
- Flat Position (1G or 1F): In this setup, welding is done from the top side of the joint. The surface of the weld remains nearly horizontal, making it one of the easiest positions for beginners due to gravity assisting the weld pool.
- Horizontal Position (2G or 2F): Here, the weld runs along a horizontal axis, but the approach varies depending on the type of weld. For fillet welds, the work is carried out on the top edge of a mostly vertical surface. For groove welds, the weld face is positioned in a roughly vertical plane.
- Vertical Position (3G or 3F): As the name suggests, the weld axis is vertical. This position requires more skill, as gravity works against the welder, often requiring techniques like uphill or downhill welding depending on the application.
- Overhead Position (4G or 4F): This is perhaps the most challenging of all, as the weld must be made from underneath the joint. Controlling the molten metal in this position takes precision and experience to prevent dripping or poor fusion.
In welding, the term “position” refers to how a joint or component is oriented during the welding process—either as it’s found in place or as it will be installed in its final application. Understanding and mastering these positions is critical for ensuring strong, reliable welds across various real-world scenarios.
1. Flat welding position
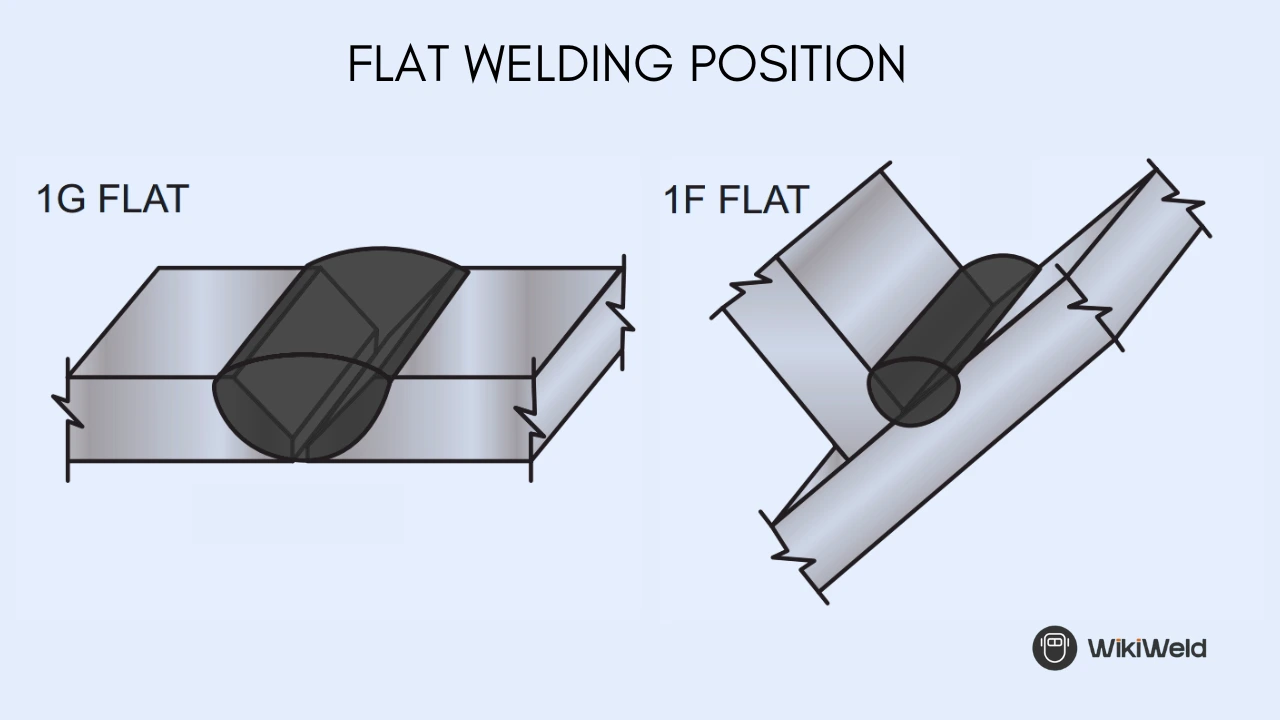
Welding can technically be performed in any position, but without a doubt, the flat position is the most straightforward. When you lay the workpieces horizontally—say, on a bench or the floor—you’re working in what’s known as the flat welding position. It’s favored for its simplicity, largely because gravity isn’t working against you, which makes the entire process smoother.
One of the biggest advantages of this position is how much less physically demanding it is compared to vertical or overhead welding. The welder can move more quickly, control the weld puddle more easily (since it’s less likely to run), and usually achieve better penetration as a result.
Virtually any welding process—MIG, TIG, stick, you name it—can be used in the flat position. The key is to apply the technique suited to the process you’re using. For instance, if you’re using stick welding, keep in mind that it generates slag. In that case, it’s typically better to use a drag technique rather than pushing the electrode.
Another important factor is your work angle, which isn’t one-size-fits-all. It depends on whether you’re doing a 1G (groove weld) or a 1F (fillet weld). If the electrode or filler wire is angled too far to one side, the heat won’t be concentrated where the joint actually forms. That can lead to incomplete fusion—a problem you definitely want to avoid.
2. Horizontal Welding Position
It’s not always feasible to perform every weld in the flat position, as real-world conditions often demand working in the horizontal position instead.
This shift introduces additional complexity, as horizontal welding is categorized as an out-of-position weld—alongside vertical and overhead positions—which generally require more refined technique and greater operator skill.
Within the horizontal position, two primary variations exist, depending on the type of weld being performed: groove welds, classified as 2G, and fillet welds, classified as 2F.
In the case of a 2F fillet weld, the weld is applied to the upper surfaces where horizontal and vertical members meet. On the other hand, a 2G groove weld is carried out along a vertical surface, with the weld face positioned directly on that plane.
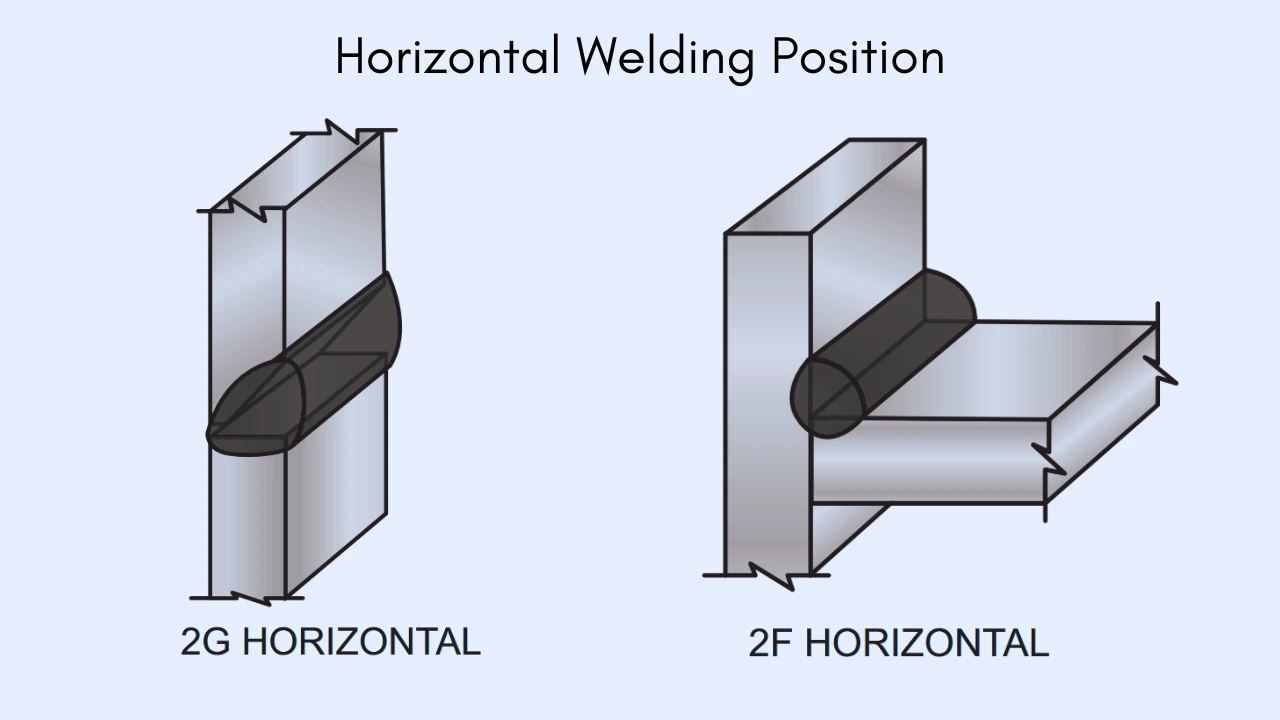
Welding in the 2G position tends to pose more of a challenge than the 2F position, mainly because of how gravity affects the molten metal.
When welding horizontally, if the metal gets too hot and fluid, there’s a risk it may sag or run, so maintaining the right consistency in the weld puddle becomes essential.
Unlike flat position welding, the horizontal position demands a higher level of control and practice, which is why it’s generally considered an out-of-position weld.
To break it down: the 2F is a fillet weld, typically done with the torch angled at around 45 degrees. In contrast, the 2G is a groove weld, where the weld axis is horizontal and the weld face is vertical—so it requires a different technique altogether.
For beginners, welding in the horizontal position can be particularly tricky. The main reason? There’s no built-up weld metal underneath to support the puddle as it cools. Without that “shoulder” of solid metal to lean on, it takes more finesse to keep things under control.
With time and enough hands-on experience, though, most welders develop the skills needed to manage this position confidently.
3. Vertical Welding Position
Welding on vertical surfaces defined as surfaces positioned upright or inclined at angles of 45 degrees or less presents unique challenges compared to flat or horizontal welding.
This technique is commonly required in the construction of buildings, tanks, pontoons, pipelines, and other upright structures. The main difficulty lies in controlling the molten weld pool, as gravity constantly pulls it downward, increasing the risk of sagging or runoff.
Vertical welding can be performed in two primary directions: upward (vertical up) and downward (vertical down). Each approach serves different needs. Vertical down welding, for example, is typically used on thinner metals.
Its shallow penetration helps prevent burn-through, making it a safer choice for lighter-gauge materials. Additionally, this method is faster, which is a key advantage in high-volume production environments where speed matters.
To get good results in vertical welding, fine-tuning your welding parameters is essential. Lowering both wire feed speed and voltage can help maintain control of the weld puddle and prevent it from spilling out of the joint.
For those using machines with Auto-Set™ or similar technology, it’s recommended to select settings meant for thinner materials—even when welding thicker base metal. This helps reduce heat input, making it easier to manage the weld pool and counteract gravity’s effects.

When performing vertical welding, selecting the correct electrode angle is crucial. For a 3G weld, maintain a 90-degree travel angle, while a 45-degree angle is more appropriate for a 3F weld.
As you weld, don’t just push the puddle straight upward. Doing so usually leads to a ropey bead that doesn’t properly tie into the edges. Instead, take your time to work the puddle side to side, making sure it reaches both edges of the joint. Focus on holding a bit longer at the toes of the weld, then move more quickly through the center as you progress upward.
There’s no single “correct” motion for manipulating the puddle — it often comes down to what feels right in your hands. Common techniques include a zigzag pattern, forming upside-down T shapes, or stacking small triangles vertically. Each method has its place, and which one you use may depend on the joint configuration and your own comfort with the technique.
Before jumping into the actual workpiece, it’s a good idea to test your setup on some scrap metal. That gives you a chance to dial in your parameters and get a feel for your motion. Taking this extra step up front can save you a lot of trouble later — especially when working on critical welds.
4. Overhead Welding Position
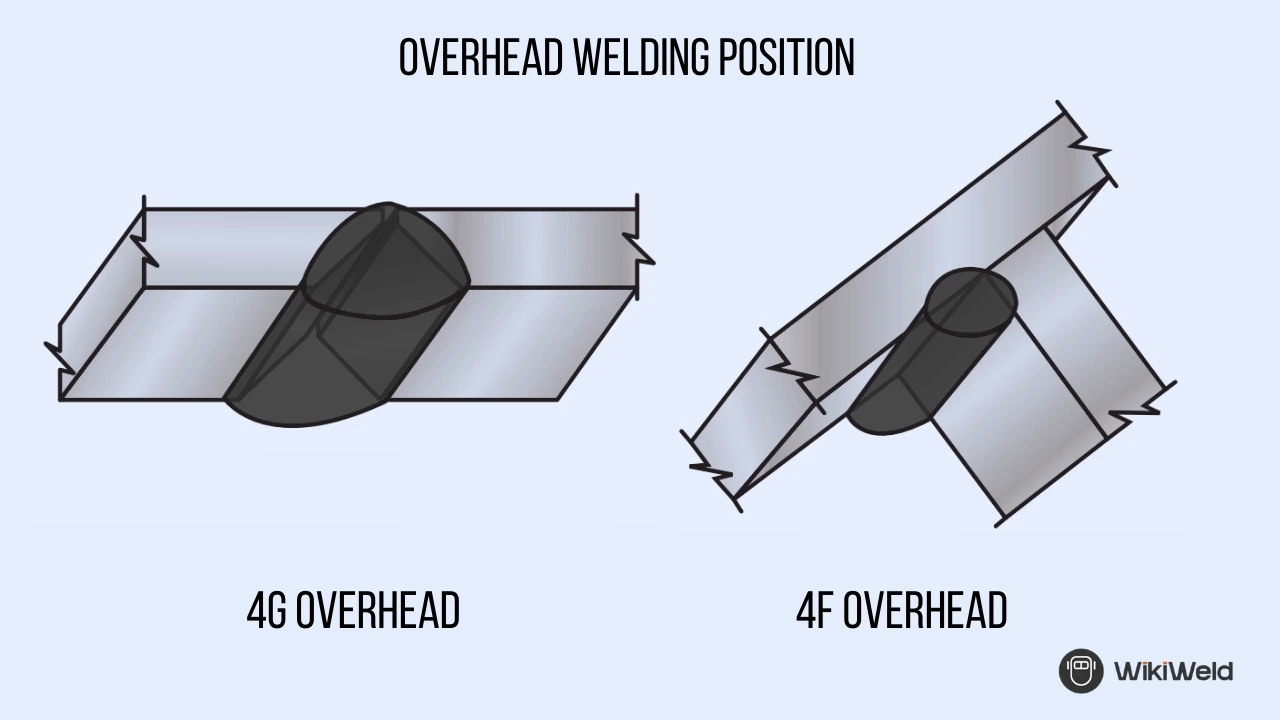
Overhead welding is widely regarded as one of the most technically demanding positions in welding. This difficulty arises not only from working against gravity but also from the need to maintain often uncomfortable and awkward body positions. However, with consistent practice and attention to technique, it is entirely possible to achieve welds of comparable quality to those made in more accessible positions.
Maintaining full control over the molten weld puddle is crucial. This is best achieved by using a short arc and reducing the amperage, as typically recommended for overhead work. Similar to vertical welding, gravity has a tendency to pull the molten metal downward, which can lead to sagging or unwanted drooping of the weld bead.
If the arc is held too long, the process of transferring metal from the electrode or gun to the base material becomes significantly less stable. This often results in the formation of large, uncontrolled globules of molten metal, which can fall from the weld area. Adjusting the arc length in a consistent and controlled manner helps minimize this issue, but it’s equally important not to allow an excessively large molten puddle to form, as that can undermine the quality of the weld.
One of the additional challenges in overhead welding is managing the weight and position of the welding cable, which can lead to arm and wrist fatigue. A practical solution is to drape the cable over your shoulder when standing, or over your knee when seated. With experience, finding a comfortable and efficient cable position becomes more intuitive.
Technically, overhead welding is executed with the torch positioned at roughly a 45-degree angle. The 4G and 4F positions are standard classifications for performing groove and fillet welds overhead.
Because sparks and molten splatter naturally fall downward in this position, extra protective measures are essential. Wearing a bandana beneath the welding helmet can offer added protection, especially around the neck area. Stick welding, in particular, tends to produce more sparks and splatter, so a full leather welding jacket is strongly recommended to shield the body from burns and debris.
Pipe Welding Positions
The American Welding Society has divided pipe welding into five basic positions:
- 1G – Horizontal Rolled Position: In this setup, the pipe is rotated either continuously or in steps so that welding is carried out within a range of 0° to 15° from the very top of the pipe. This rotation helps maintain a more comfortable position for the welder and ensures better control over the weld pool.
- 5G – Horizontal Fixed Position: Here, the pipe remains stationary and runs parallel to the ground. Unlike the 1G position, the welder doesn’t rely on pipe movement. Instead, the weld must be applied all the way around the pipe in a vertical progression, requiring consistent skill throughout the entire rotation.
- 2G – Vertical Position: In this configuration, the pipe stands vertically (perpendicular to the ground), and the weld is applied in a horizontal direction around it. Because the orientation doesn’t change, the welder must move around the pipe to complete the joint.
- 6G – Inclined Position: This is one of the more advanced welding positions. The pipe is fixed at a 45° angle, and the weld must be performed completely around it. The combination of vertical and horizontal angles introduces complexity, as the welder has to adapt to changing positions throughout the weld.
- 6GR – Inclined with Restriction Ring: Similar to the 6G setup, the pipe is also positioned at a 45° incline. However, this version includes a restriction ring placed just below the weld groove. This ring limits access and movement, making it more challenging and typically used for testing welders in high-skill scenarios like structural or pipeline welding.

5G Welding Position
In the 5G welding position, the pipe is fixed horizontally along the X-axis and remains stationary throughout the process it cannot be rotated. The welder must move around the pipe to perform the weld, maintaining control over the arc and technique as the position shifts. While this setup shares similarities with the 1G position in terms of the pipe’s orientation, the key difference lies in the lack of rotation in 5G.
According to ISO/EN standards, this position is also referred to as “PF.” Welding in the 5G position typically involves vertical progression, which may be carried out in either an upward or downward direction, depending on the welding procedure being used.
6G Welding Positions
The 6G welding position is widely regarded as one of the most challenging configurations for welders to master. It is often a prerequisite for certification due to the level of skill it demands.
While it bears some resemblance to positions such as 5G, PH, or PJ, what sets it apart is the orientation of the pipe—mounted at a 45-degree angle relative to another. This configuration is also referred to as the 6G Uphill (H-L045) or 6G Downhill (J-L045) position.
In many training and testing environments, the 6G setup is used to evaluate a welder’s full range of capabilities. It is sometimes referred to as the “overhead weld position” or simply the “certification test position.”
What makes this position particularly demanding is the fixed 45-degree pipe angle, which forces the welder to work through multiple spatial orientations. As a result, welders are required to maneuver their bodies into various positions to maintain control and precision throughout the process.
Three primary welding orientations are involved in the 6G position: horizontal, flat, and vertical. Among these, the horizontal weld is typically the most challenging due to gravity’s effect on the molten filler metal, which tends to flow downward.
This adds complexity, especially during vertical welding, which often involves overhead work and requires considerable dexterity and coordination.
Due to these complexities, extensive practice is essential before attempting a 6G weld in a real-world scenario.
Although certified welders may not frequently encounter the 6G position during routine operations in industry, it remains a standard part of pre-employment testing because of the comprehensive skill set it demonstrates.
The 6G welding position is primarily applied in the fabrication and installation of piping systems. Industries such as chemical processing, oil and gas, and various heavy industrial sectors rely heavily on this technique when assembling pipelines and similar infrastructure.
Conclusion
Before beginning work on a welding task, it’s wise to start with a few practice runs. These initial passes help you get a feel for the weld path and ensure that you can complete the full length of the weld while maintaining a position that feels natural and steady. Comfort might seem minor, but it plays a crucial role in achieving consistent, high-quality welds.
The choice of filler metal and the method of metal transfer both play a significant part in determining the most suitable welding position.
For instance, if you’re planning to weld overhead, it’s essential to confirm that the filler metal you’re using is appropriate for that position. You’ll also want to fine-tune your welding parameters to better suit the demands of overhead welding, helping you get the best possible results from the process.
FAQs
What are the 4 types of welding position?
1. Flat
2. Horizontal
3. Vertical
4. Overhead
What is the 6 position of welding?
6G Welding Position: One of the most challenging welding positions, 6G is similar to 5G, but the pipe is positioned at 45° to the other. The 6G position requires three welds: horizontal, flat, and vertical.
What welding position pays the most?
Here are the current top 5 highest-paying welding jobs.
1. Rig Welder. Annual Salary: $52,000 – $207,000.
2. Underwater Welder. Annual Salary: $38,000 – $147,000.
3. Nuclear Welder. Annual Salary: $22,000 – $143,500.
4. Industrial Pipeline Welder. Annual Salary: $23,500 – $133,500.
5. Military Support Welders. Annual Salary: $37,000 – $160,000.
What is the hardest welding job?
1. Underwater Welding.
2. Oil and Gas Industry Welding.
3. Structural Steel Welding.
4. Shipyard Welding.
5. Aerospace Welding.
6. Nuclear Power Plant Welding.
7. High-Pressure Vessel Welding.
8. Pipeline Welding.
What is the toughest welding position?
Welding in the vertical position is more challenging and can be more dangerous than welding in the flat or horizontal position.
What is the easiest position to weld?
Flat Welding Position
Also known as the down-hand position, the flat position is the easiest of all the welding positions. A flat position is the common type of weld. It is the first weld that beginners learn. In this position, you are not welding against gravity.