Not many welders I know want to attempt it, although it can be done. When super heated magnesium tends to catch fire and once started, God help you if you have to put out a magnesium fire.
Magnesium has a flashpoint of 883 ˚F and burns at a temperature of 4,000 ˚F. That kind of heat uses up water and even carbon dioxide as fuel, which is just enough to discourage most welders from trying it.
How To TIG Weld Magnesium In 6 Steps
Before we delve into the more complex issues, let’s first take a look at the process. Here, we will give you step-by-step instructions on how to properly TIG weld magnesium.
Step 1: Identifying the Base Metal
At times, it can be difficult to determine what metal you are working with because they all look pretty similar. And, it can be even more challenging separating magnesium from aluminum since their structure and appearance are similar.
So, that is a major concern. The methods of tig welding magnesium and tig welding aluminum are completely different. So, if you applied the wrong method on either of them, it could have disastrous results.
Okay, okay, maybe the term ‘disastrous’ could be stretching it a bit, but if you look at the value of both of these metals, it is a shame to see them go to waste. They both display different properties, which is why they are a significant part of most aerospace designs.
In fact, if you look at all the helicopters and airplanes that you might see from time to time, integral parts of the inner gears, and structures are made from aluminum and magnesium alloy. And why? Because they weigh very little but still retain high structural integrity.
So, it would be ridiculous to allow these metals to go to waste for no good reason, wouldn’t it? Exactly. That’s the one main reason you need to always check out the base metal before welding it.
And don’t worry, you can easily tell what metal you are working with by a few simple tricks. And we will go through that part completely with separate instructions shortly. But first, let’s find out about the actual welding process.
Step 2: Alloyed Composite Identification
When it comes to TIG welding, identifying the metal as aluminum or magnesium is not sufficient. You will also need to analyze the alloy composition of the metal.
Since magnesium does not naturally occur in the pure form, it is much more reactive to other metals. Therefore, it prefers to travel in combinations, otherwise known as alloys.
In nature, magnesium can be found in many different combinations with another metal – such as aluminum, zinc, zirconium, and thorium. These combinations are what are referred to as magnesium alloys.
There are many different combinations of magnesium alloys that exist naturally. The other possibility is that the piece you are working with can also be pure magnesium, while exceedingly rare, is not unprecedented.
Therefore, once you identify the welding piece is magnesium, the next step is to determine the correct alloy. This is a vital step since the alloy identification will determine your subsequent step in the process.
You remember how much different the welding technique is for aluminum versus magnesium right? The alloys are no different. Since with alloy composites we will need to be working with filler metals in subsequent steps.
Between the combination of metals and the non ferrous filler options, the options are great. Not all of these filler metals can withstand the same temperatures. Therefore, it is imperative you know the alloy composite to work with before you preheat the materials.
In fact, not only do you need to adjust the heating temperature, but you also need the correct voltage settings and the correct electrode type too. These are all very important aspects of welding, and cutting metals and minerals.
So how do you determine, or know, the right type of alloy composite? realistically the safest option is to call the manufacturer, they would have some type of record referencing an alloy type as they were the ones who supplied the composite.
The history of the composite helps with determining not only the type of alloy, but also the appropriate equipment. All welded materials have inserted documentation stating the do’s and don’t of the material you are welding. You need to read the documentation closely before you start.
However, there are times when you cannot contact a manufacturer for various reasons. In that situation identifying the actual alloy composition will become much more difficult, but not impossible, depending on your skills.
Most of the limit on identifying a magnesium alloy without documentation comes from locating accessible scrap material. In a system level experiment, you may make changes however you could ultimately destroy the welded piece.
This is why you would rather look for non-destructive scrap material to work with. It’s fine if you have a number of scraps (i.e bits and pieces) as well as the principal boulder. If this can’t be established in your experiments, you will eventually need to destroy a portion to move on.
You may wish to conduct, if possible, a serious of experiments, such as calculating the strength to weight ratio, various molar weights of the associated compounds, etc. You can also do a series of reactions to see how each of the alloys react to a particular compound.
Overall identifying with these topics may be considered basic level knowledge in any welder’s tool kit. However as if you need help remembering any of them specifically, you can always call the American Welding Society.
They have a whole library of Welding Handbooks to reference welders on every conceivable situation a welder could experience. So don’t be shy to use all of their handbooks should you become suddenly stuck and need additional welding advice.
Step 3: Confirming the Welding Area
Since we are finally past the metal and alloy stuff, we can now move on to the actual welding! But the first step in preparing the magnesium for welding is to define the welding areas.
This serves to clean in and prepare the piece of welding metal. This way, you have a clear idea of what you will be working upon, and a systematic way forward. In short, it’s like a little map that later guides you in the rest of the processing period.
You can either create a mind map for the specific areas if you are indeed talented enough, or you can use a pointer metal marker and simply trace around the edges for the areas you will operate in later. Alternatively, you can use any random board markers because this is just a temporary map.
Just don’t use a permanent marker or a marker like that. They could potentially produce unintended chemical reactions, such as passive corrosion and stuff. Also it creates further an inconvenience if you cannot simply wipe away the marker. Overall it is best to avoid that anyways.
Step 4: Grinding The Welding Area
Once you have done choosing which area you’ll be working on, it is time for the big guns. Now you can get into grinding the area, which is an important part of the welding procedure. It will allow you to fill down the area, or lay beads across the base.
However, some welders do dare to completely crack up the surface, then they will fill or cover up the crack with filler metal or magnesium beads. I would not suggest you go this route, since it is not as reliable as simply grinding.
Many might disagree, but grinding is actually more advantageous than cracking. The reason is that while you are cracking your surface you do not know what kind of equal pressure you give to all points of this surface. Some part smashes in a bit deeper and others not so much.
On the contrary you have a better opportunity for equal pressure distribution when you grind. That way all surface points are more or less equal, with little to no visible inconsistencies.
As an extra benefit, it is easier too, to fill the base when you grind first. As I mentioned above, crackings leads to improper openings, and magnesium, being the lightest structural metal cannot possibly fill those enormous gaps correctly.
Only the upper surface gets kind of filled, the rest not, since I’d like to reiterate, metal is too lightweight. So, you have, as you can see somewhat of a structural imbalance. And that cannot be good for the welding piece in the long run, because it becomes compromised.
Meanwhile, with grinding, since all gaps were pretty equal in dimension, the filling part is much easier. The filler can get to all the gaps and crevices without excess effort, making for a proper binding with the base that is structurally sound.
Step 5: Utilizing Time Properly
Welding clearly takes a lot of concentration and with concentration comes time. So, naturally, most people will look for ways to make the choice of procedure not so boring and time-consuming. And that’s where they can make a significant mistake. In an effort to work quicker they blow it by not doing quality work.
Additionally, some may even skip steps which essentially means they fail altogether. In that case, not only do they ruin the welding pieces, but now they have to start all over as well. So, they wind up doing the work (practically) twice.
The lesson learned — don’t use shortcuts unless you’re absolutely sure they’re going to work. Also, and most importantly don’t compromise on the work itself. You may get lucky and make a small mistake here and there on your first tries and that’s alright.
But purposely doing things that will get you to cut quality of welding is highly not recommended. This is because a product’s structural integrity is directly related to the quality of welding. Now do you see why we recommended grinding instead of just cracking the surface?
Precisely. Cracking a surface may take less time and energy, but it could be unreliable in the end.That’s why even though grinding can take a long time with great concentration, it is the only way to go. Please note, there are proven methods for reducing time in the procedure of grinding. Professional welders have utilized these methods over the years and have refined their application to cut the time spent on grinding as it relates to metal work.
For example, a coarse carbide burr should be used to grind metal. This will allow you to cover more real estate in one movement, whereas a smaller burr increases the grind to space ratio and is time consuming.
Additionally, take the time to carefully clean the metal before you grind it. Magnesium is quite porous because of its lightweight and if you do not clean it properly beforehand, it make become cumbersome to manage when you get into the grind process.
Opportunities abound for the use of chemicals for cleaning metal. A solution of chromic acid is a great way to clean metal quickly. Here are what you can include in the cleaning solution:
- Chromic Acid (24 oz)
- sodium nitrate (40 oz)
- calcium flouride (⅛ oz)
- water (50/60 oz)
Essentially what this should make is a gallon of the special cleaning solution, which is enough to soak into the piece of metal thoroughly. Just leave the concoction there for about an hour.
If you want the process to happen more fast, here is a great option. Heat the welding metal in the correct oven temperature for a few minutes prior. This will significantly accelerate the rate of the reaction.
Therefore, when you put the cleaning solution on the lathe of a piece of pre-heated magnesium, it will clean more quickly.
However, please make sure you are wearing protective gloves on your hands and eyes and safely handling the concoction, along with the fact that this process is corrosive. And please do not handle the heated magnesium directly.
Step 6: Filling the Gaps
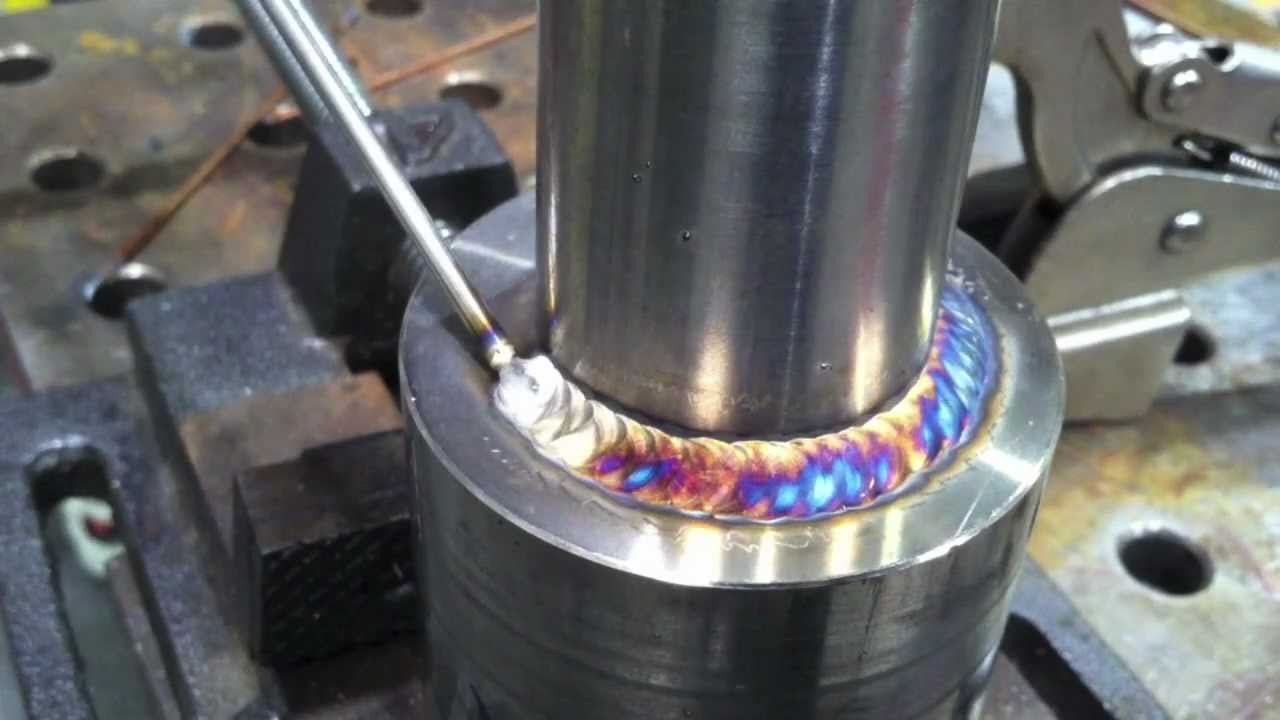
Finally, you must fill in the space from the grind with your filler metal. There can be various filler metals that you can use and it is important to take note that most welders will use the AG 92 A filler rod for this purpose.
This filler rod is used as it is usually an all-purpose filler, so once again you can’t go too wrong with it while welding, and it is fairly priced.
Either way, when heating the weldment, you must have to keep in mind that magnesium warms rapidly. It maybe starts to melt roughly about 800 -830 degrees Fahrenheit, and reaches as high as 1200-1300 degrees Fahrenheit.
So you should set your temperature correctly before you weld. And also use inert gases, and you would prefer to use Argon as a buffer because at this temperature reactive gases or metals will ignite on contact! Also don’t forget that when welding magnesium to use the alternating current.
Additional Safety Precautions for Tig Welding Magnesium
Magnesium can be a treacherous and difficult metal to work on. The reasons being for this are that:
- Magnesium is a combustive metal – once it ignites, it burns at 4,000 ˚F, high enough to break apart to the molecular bonds of H2O, releasing the oxygen and instantly turning it into fuel, the same for CO2. Typically, to help extinguish a magnesium fire, the only option is to starve it of oxygen which can be through sand, cement powder, or class D Osha recommended extinguishers.
- Magnesium is a spongy metal, with porosity meaning that its microscopic structure is full of tiny pores. Since magnesium casting is predominately used in machine parts and the fact it has porosity, a magnesium casting can absorb quite a bit of oil. This increases the chance a fire from a welding arc, and off of oil, the weld becomes even more difficult to contact.
- Magnesium is alloyed similar to aluminum and in most cases as a zinc alloy. Both types of metals also tend to develop an oxide layer on the surface making the material hard to identify at times.
- Magnesium is combustible and, the shavings from grinding and cleaning the metal has the potential to burst into flame. So, once grinding and preparing the metal for welding, have a good practice and wipe down the station, and sweep the area. Any loose shavings will be a potential fire hazard from errant arcs or sparks.
- Magnesium alloys, similar to aluminum that are heat treated in order to increase strength, are vulnerable to excess heat. Get the alloys too hot, and they will lose their strength.
Tips for welding magnesium castings
- Ensure that you clean as well as you can with aceton and a carbide burr… Use a coarse burr that will not load up.
- Typically, filler rod choice is dictated by a written procedure based on the chemical listing of the magnesium alloy base metal. But if you have the choice, use az101 filler rod
- Preheat thicker thicknesses to roughly 300f
- Tig machine settings should be the same as aluminum but at 50/50 argon/helium makes a huge difference.
- Light up and start increasing the amperage until it barely puddles. If it does not puddle clean at first, stop, burr, wire brush, burr, wire brush, and so on until it puddle cleans up.
- Oil gets lodged in the pores of this stuff, and sometimes it simply takes time to get enough oil out to weld clean.
- Use a much closer arc length than on aluminum. So close that you will think it is too close.
- Weld small beads and clean in between beads with your small 90° air grinder and a carbide burr and then a stainless wire brush.
FAQs
Can you weld magnesium with TIG?
Although several types of welding processes can be used for welding magnesium, the ideal method is Tungsten Inert Gas (TIG) welding, which may also be known as Gas Tungsten Arc Welding (GTAW). It is a process invented in the 1940s specifically to be used for welding both magnesium and aluminum.
What filler rod is used for TIG welding magnesium?
MasterWeld AZ92A is a specialist TIG Welding rod for the welding of most Magnesium alloys. Typical applications are for repair of Magnesium castings, broken or worn out parts of different Magnesium alloys.
Why is magnesium hard to weld?
Magnesium is prone to cracking under thermal stress; this can happen during casting, thermal expansion, and welding around the heat-affected zone.
Is it safe to weld magnesium?
Safety Precautions: Welding magnesium requires strict safety measures due to the risk of fire and explosions. Ensure you’re working in a well-ventilated area, away from flammable materials.
What is the best way to weld magnesium?
Since magnesium has an oxide layer on its surface, like aluminum, it’s highly beneficial to use AC TIG welding. The alternating current oscillates between DCEP and DCEN to simultaneously achieve oxide removal and penetration.
Is magnesium TIG AC or DC?
Since magnesium has an oxide layer on its surface, like aluminum, it’s highly beneficial to use AC TIG welding.